Kenmore 117.959
All photographs by Paul M. Clayton unless otherwise noted. Click on a picture to see it larger.
Posted 01/12/24

There is not much to be found on the internet about the Kenmore 117.959, so I am presenting some notes on reconditioning mine. For many years the White Sewing Machine Company supplied Sears with rotary-hook machines to be branded as Kenmores. Any Kenmore 117 is a White.
Serial #547130. I bought it from a Craigslist seller 11/19/23 $20. He advertised it as a Kenmore e6354, which puzzled me as I could find no Kenmore model with a number anything like that. But some internet pictures led me to believe it was a White-built machine from the 1940s, and that turned out to be correct. Turned out that he was quoting the motor number! The seller said it belonged to his great-grandmother, and that she had the machine serviced every two years. He had a receipt which he said was from the last service in 2010, $11.77, so I expect the machine was little if ever used after that. He said the machine ran, but when I tried to turn it over with the hand wheel I found it locked up. I think what he meant was that the motor ran. It was missing bobbin case and bobbin but came with a box of attachments. Drive wheel has flat spot. Cosmetically near perfect. Came with a User's Manual.
If you've never used a White rotary - the hand wheel turns in the opposite direction from any other sewing machine you have probably ever seen. The Kenmore 117.959 is a straight-stitch only machine, with reverse.
When I got the machine it was typical in that it wouldn't turn over. Heavy oiling and working the hand wheel eventually got it to spin.
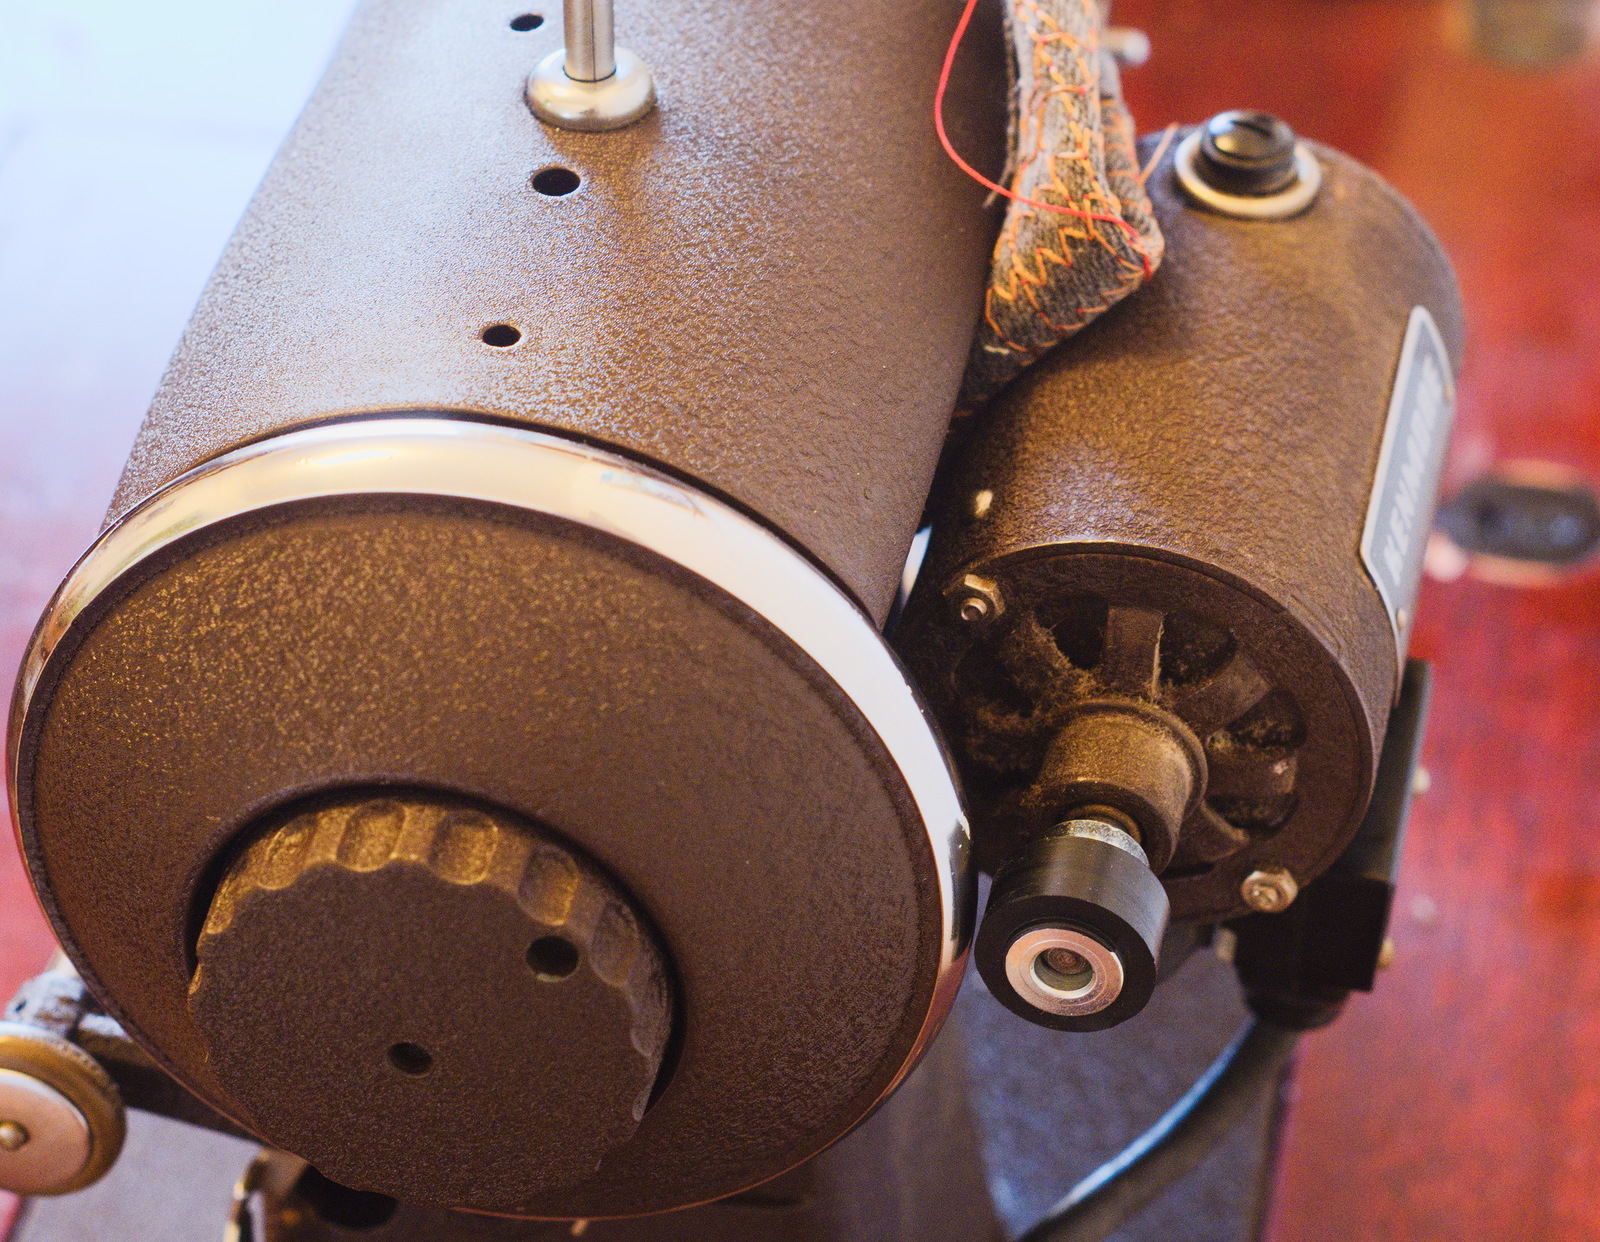
The motor drives the hand wheel with what White called a pulley, I would call it a roller. The motor mount is sprung to hold the roller against the hand wheel. Over months - years - decades - of sitting idle in a dark corner, the roller gets a flat spot. It will still work, but there is a noticeable thump each revolution. New rollers are easily available, if a little pricey. Owners in the know slip a piece of cloth or a wooden wedge in between the motor and the machine to hold the roller off the hand wheel when they aren't using the machine. That way the roller lasts longer. My machine came with a flat roller, which I replaced. The replacement rollers perhaps aren't as soft and grippy as the originals. Even with the hand wheel immaculately clean and free of oil, the roller slipped on heavy fabric stacks. I found this solution at Pungo Living - stretch a Bissell Style 7/9/10/12/14/16 rubber vacuum cleaner belt over the wheel. I ordered one to see if it worked. I found the belt fit too loosely on the hand wheel of my machine to do any good. With time, the new roller started to conform better to the shape of the hand wheel, which gave less slippage.

My Kenmore came in a nice table. One idiosyncracy of all the White-built Kenmores is that the base is squared off at the corners and the hinges are spaced differently from Singers, so the Kenmores won't fit in Singer tables. So if a table is important to you, try to get a machine already in one. Empty Kenmore tables are hard to find.
All the stitch mechanism is in the left end cap. You take it off by setting the machine with the take-up lever at top position, removing one screw in the top of the end cap from the left side, and one from the bottom right side. The connecting rod is loose on both ends and may fall off, hang on the drive side or hang on the driven side. If possible, note its orientation to make it easier to get it back together once you are finished. But if not, there is only one way it will fit and not rub on anything, so you can figure it out without too much trouble.

On left, which is the front with the end cap mounted, is the tension adjustment lever. Moving to the right, the needle bar, with the shaft that the connecting rod will attach to flopped over to the left. Next, the presser bar. In mine it was frozen. The sliding points are at the top and bottom, and where the lifter tab goes through the body on the right, which will be the back with the cover mounted. the two intermediary blocks are attached to the bar and move with it. Copious oiling and judicious tapping with a wooden mallet on the end, after I removed the presser foot, and then soaking with Liquid Wrench and letting it sit eventually resulted in the satisfying thunk in the middle of the night that meant the bar had come free. The presser foot holder comes off by removing the set screw, but just to remove and replace the foot requires you to loosen the knurled nut and slide the foot forward. On mine, the nut was frozen, but overnight soaking in Liquid Wrench got it free. On the right, at the top, is an adjuster for presser foot pressure. Hook it in the down position for pressure, let it go to top position for minimal pressure. At the bottom is the presser foot lifter. Raise to lift foot and it will go into a detent, lower and it will drop loosely, this is right though it will seem like something is broken to anyone used to a Singer.
To reattach, hang connecting rod on drive side. Line up shaft on needle bar with hole in bottom of connecting rod and slip it on, then gently push the whole assembly onto the main body, insert and tighten screws holding them together. Rotate the machine by hand, there may be a slight bind the first time around but then all parts should line up and machine should turn freely.
The machine takes common Singer 15 needles. When you insert a needle, you may find that it doesn't align with the hole in the cover plate. To adjust, slack off the two screws that attach the end cap, move the end cap until the needle hole lines up and then tighten the two screws. If it is too far off to get it lined up, you may have to - gently - bend the half-round large tab at the front top of the cover plate. I had to bend mine a tiny bit and then was able to get everything aligned. The needle on mine is close to the right side of the needle hole and I have read that that is correct for these machines.

Looking underneath the machine, I noticed with alarm that the shuttle area at the end of the main shaft looked bent downward. On consideration, I decided this must be by design, since otherwise the machine would not sew such an even, perfect stitch - in fact, if this indicated damage, the machine probably wouldn't sew at all. But to relieve my mind, I searched around Youtube until I found a fleeting glimpse of the bottom of another 117.959 and could see that it had the downward bend as well - so, chalk it up to another idiosyncratic design feature of the White rotary.
The needle may be familiar Singer, but the bobbin and case are not. The machine was missing these parts when I bought it, but I found replacements on Ebay. They're not cheap, so if the seller can track them down, that's a bonus. Considering I only paid $20 for this machine, I wasn't too concerned with having to drop a few more dollars in it. As far as threading goes, check out this video at Lydia Hawk Designs on a Kenmore 117.59, which works the same as the 959. Picking up the tension spring is a little tricky the first few times, but after you get used to it, no trouble. Likewise, getting the thread under the spring on the bobbin holder requires some fiddling. I find that using a small screwdriver to push the thread back under the base of the spring helps. Also note that Lydia puts the bobbin in the case with the thread going the opposite way that I do - I have it come off counter-clockwise. The Owner's Manual is completely unclear about this. Note that picking up the bottom thread is not nearly as hard as Lydia makes it look - it's just like any other machine, you can pull up on the top thread to lift it out. Another good video about bobbin winding and threading is at TK Sewing Machine and Repair. Tanya threads her bobbin cases like I do.

With the machine cleaned up and oiled, I have done a couple of projects, and this is one of the smoothest, best-stitching, best-behaved machines I have ever used. The only way I have been able to get any stitch issues out of it has been to overfill the bobbin. One thing I have noticed, it takes a few minutes for the machine to warm up in my cold house. So before starting a project, run a few test strips to dial in tension and get the machine warm. As far as thread goes, I have been using a size 14 needle with Gutermann Tera 80 Tex 35 polyester thread, and it works very well.
Now, for the question that always gets asked - will it sew leather? I have seen a video of this machine sewing through one layer of thin leather, but no, this is not the machine you want for sewing leather. Will it sew bags? It would probably be fine for sewing bags in light material, but the presser foot will not raise high enough for thick seams, so no, this is also not the best machine for making bags. Will it sew quilts? I can't really answer that since I have never sewn a quilt. Will it sew garments? Yes, it will sew beautiful seams, front and back and I would say it is about as good a garment sewing machine as you will find. It's perfectly capable of handling denim and light canvas.
Email me at kenmore@neuseriversailors.com if you live in the North Carolina area and would like to buy the machine. $100 and I'll meet you somewhere in the central part of the State to deliver it. I'd love to keep it but I already have too many machines.
Here is a short video of the machine running:
Copyright © 2024 Paul M. Clayton